

Ở phần trước mình có giới thiệu bạn cách lập trình dialogflow fulfillment thông qua Inline Editor. Để đơn giản nhất bạn nên sử dụng phương pháp này. Bạn tham khảo cách viết code trong Dialogflow Fullfillment.
Tuy nhiên, mình cũng muốn giới thiệu bạn một cách khác là lập trình webhook. Khi hiểu cách khởi tạo bạn có thể tuỳ ý sử dụng ngôn ngữ lập trình mình yêu thích, code lưu tại server nào bạn thích Heroku hay google firebase…
Trong phần này mình sẽ hướng dẫn cách sử dụng firebase function của google làm nơi lưu mã nguồn và biên dịch. Sau cùng bạn khai báo link webhook cho Dialogflow
Khởi tạo 1 agent mình đặt tên la ArtlineBot

Tiếp theo bạn vào Menu của nó và đến […]cloud function. Trong quá trình này nếu google có hỏi bạn gì đó liên quan đến billing thì bạn ok đi, không bị trừ tiền đâu nha.
Tiếp theo bạn Create Funtion và khai báo như mình nha. Ban để ý các vòng màu đỏ
- Name: Tên hàm (Artline)
- Trigger: HTTP
- Runtime: Node.js 8
Có 2 files bạn cần quan tâm tương tự như khi lập trình trên Inline Editor vậy : Index.js và Packed.json.
- File Packed.json cấu trúc kiểu JSON mục đích khai báo các tài nguyên thư viện cần thiết khi biên dịch và chạy chương trình
- File index.js được viết bằng Javascript (node.js) chứa mã thực thi chương trình của bạn
Copy đoạn code sau vào trong index.js
‘use strict’;
const functions = require(‘firebase-functions’);
const {WebhookClient} = require(‘dialogflow-fulfillment’);
const {Card, Suggestion} = require(‘dialogflow-fulfillment’);

process.env.DEBUG = ‘dialogflow:debug’; // enables lib debugging statements
exports.dialogflowFirebaseFulfillment = functions.https.onRequest((request, response) => {
const agent = new WebhookClient({ request, response });
console.log(‘Dialogflow Request headers: ‘ + JSON.stringify(request.headers));
console.log(‘Dialogflow Request body: ‘ + JSON.stringify(request.body));

function welcome(agent) {
agent.add(`Welcome to my agent!`);
}
function fallback(agent) {
agent.add(`I didn’t understand`);
agent.add(`I’m sorry, can you try again?`);
}
let intentMap = new Map();
intentMap.set(‘Default Welcome Intent’, welcome);
intentMap.set(‘Default Fallback Intent’, fallback);
agent.handleRequest(intentMap);
});
Tiếp theo chúng ta cần khai báo các thư viện cần cho chương trình. Các khai báo này theo cấu trúc JSON. Bạn copy đoạn code sau và lưu trong file Packed.json
{
“name”: “dialogflowFirebaseFulfillment”,
“description”: “This is the default fulfillment for a Dialogflow agents using Cloud Functions for Firebase”,
“version”: “0.0.1”,
“private”: true,
“license”: “Apache Version 2.0”,
“author”: “Google Inc.”,
“engines”: {
“node”: “8”
},
“scripts”: {
“start”: “firebase serve — only functions:dialogflowFirebaseFulfillment”,
“deploy”: “firebase deploy — only functions:dialogflowFirebaseFulfillment”
},
“dependencies”: {
“actions-on-google”: “².2.0”,
“firebase-admin”: “⁵.13.1”,
“firebase-functions”: “².0.2”,
“dialogflow”: “⁰.6.0”,
“dialogflow-fulfillment”: “⁰.5.0”
}
}
Chúng ta cần chỉ định hàm thực thi. Bạn kéo xuống phia dưới
Function to execute: dialogflowFirebaseFulfillment
Nhấn nút Create để deploy hàm này. Sau khi hoàn tất bạn click vào hàm vừa tạo ra và copy URL theo hình dưới đây (chọn tab trigger)

Bạn có thấy link URL đó không. Đó là link webhook của bạn. Những gì chúng ta thực hiện từ đấu đến giờ là trên server firebase của google, không liên quan gì đến Dialogflow. Bây giờ chúng ta trở về giao diện console của Dialogflow để chỉ định link webhook
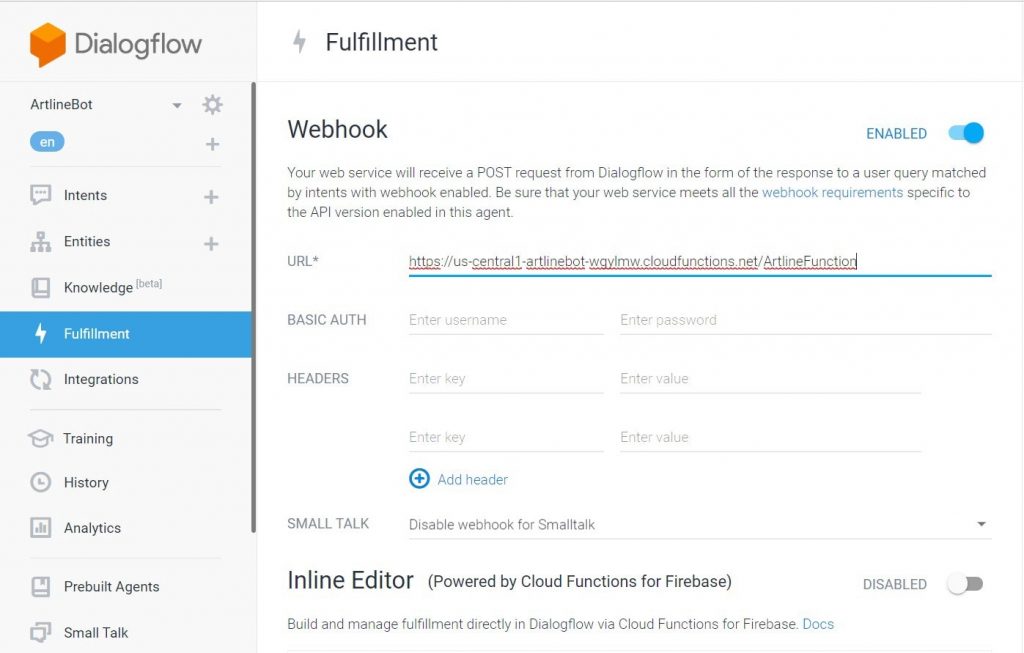
Như vậy là xong, bạn có thể thử nghiệm chương trình của mình. Sau này bạn có thể viết bằng một số ngôn ngữ khác như C#, Python, Java… và lưu code trên server nào tuỳ bạn
1 thought on “Lập trình Dialogflow Fulfillment thông qua webhook google firebase function”